Tuesday, November 22, 2011

Happy Thanksgiving Canvas Art

Just two more sleeps until the big TURKEY DAY is here.  Today I wanted to share an altered canvas art display I made to showcase a photo from our big Family Reunion Thanksgiving we did last year.

These are easy to make from scrapbook supplies you may already have laying around. 

Here are some quick directions if you want to make one of your own:
1. Using acrylic paint of your choice, lightly brush a canvas of your size choice.  I used a 12X12.
2. Set canvas aside and let air dry. Once dry, using a Distress Ink pad, I lightly inked the edges of my canvas
3. Select a patterned paper to match your theme and cut a piece about 4 1/2"X12" to run vertically and tear the edges on both sides. Ink edges as desired. Adhere to dry canvas about 1 inch from the left edge of the canvas.  You should use a good quality, quick dry scrapbook glue such as Scotch Liquid Quick Dry Glue. It holds great to the canvas and is easily found at craft stores. It goes on white but dries clear.
4. Cut a different piece of patterned paper 3 "X 12" to run horizontally. Use a craft border punch of your choice to punch just the bottom edge.  Crinkle the paper into a ball, unroll and repeat a couple of times until your paper is really crinkely (that's a word, right?).  Lightly rub an ink pad over the top, catching ink on the crinkled pieces.  Adhere to the canvas horizontally using the liquid glue.
5. Cut a 5"X7" piece of cardstock.  Use an embossing folder and emboss an image of your choice.  I used a Cricut Autumn Embossing  folder.  Using a sander (I used Tim Holtz sanding block), gently sand the tops of the embossed design.  Adhere the cardstock piece to the canvas overlapping your vertical piece of patterned paper slightly.
6. Make a photo mat to fit the size of your photo and adhere overlapping the embossed cardstock.  You can place your photo either horizontal as I have or vertical if you prefer.
7.  Embellish as you like with title, sayings, bling, etc.

Here is a close up of the embossed piece.

Now I just need to add my photo and we are all set to display on our buffet serving table this year.
Hope you give this a try sometime.  You can adapt to any theme and keep it simple like this or really go to town with your paper layering and embellishments.  I am working on a Christmas one right now that will be much more elaborate so come back and check that out soon.

Wishing you each a very Happy Thanksgiving !!  Gobble, Gobble

Monday, November 21, 2011

Getting Ready for Thanksgiving

Well, we are down to the final 3 days before the big Thanksgiving Feast in the USA is upon us.  Time to start pulling out all the Thanksgiving decorations and getting them put up.  Luckily, last year I made quite a few things to help bring the Thanksgiving feeling to our family dinner. Here are some of those projects from 2010:

The mantle banner says Give Thanks. I made it with
various chipboard pieces covered in fall themed patterned paper.
I added a ruffled crepe paper trim around some of the pieces
and them decorated with all kinds of fall ribbons and
embellishments I had collected over the years. 
Loved how it turned out !


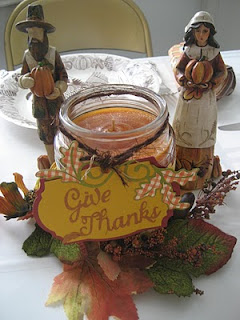
I made these special Thanksgiving candles
from glass jar candles I bought at Michaels
and then wrapped a strip of fall paper around the middle.
Then I used the Cricut Lacy Labels and Thanksgiving
cartridge to make these Thanksgiving themed
tags and hung from each with fibers. 
A few pilgrims and indians and some fall foliage scattered
around the table and we had lovely table decor.

For place settings we used gold chargers with our Turkey paper plates.
LOL...how is that for elegance for a crowd? 
My granddaughter and I made the napkin ring holders
our of cardstock and patterned paper rings, a scalloped shaped punchout,
and some felt pilgrims boys and girls in felt we bought at Hobby Lobby.
Tada ! 

So this year, all I need to do is unpack all these handmade gems and set the table !  Come back tomorrow and I will show you what I made for this year's Thanksgiving.

Monday, November 14, 2011

Finally, CRICUT CRAFT ROOM HELP

WOW...finally some help with Cricut Craft Room for those of you that want to try it out and have been lost on your own.  Narelle and Scrapalette have created a blog with all kinds of great tips just for Cricut Craft Room.  Just go to Cricut Craft Room Blog.   Thanks ladies !

Tuesday, November 1, 2011

Introducing Lady Cricut

I have a new scrapbook buddy...Lady Cricut.  She has a slight British accent and comes from a Royal Cricut Bloodline...or so she says.  She has decided to take up residence in my scraproom and appearantly decided to steal my crown for her very own.  We are going to have a talk about that...
Lady Cricut reigns over her scrapbook domain.

Lady Cricut is wearing her ever so fashionable Scrapbook apron. 
She is a great example to us all since she keeps her camera ready for picture taking
so she doesn't miss capturing those specials moments to treasure and share with others in her scrapbooks.

I have a feeling Lady Cricut is here to stay and will want to tag along on all my own scrapbook adventures
so don't be surprised if you see me with her at my next scrapbook event.


Halloween Aftermath

We enjoyed dressing up last night and giving out candy to all the cute kiddos that stopped by. Even though our kids are grown we both love carving a pumpkin every year to put out on Halloween night.  This year's efforts were done about an hour before the trick or treaters showed up so not too elaborate but cute.
The kiddos seemed to really love them.


LinkWithin

Related Posts with Thumbnails