Monday, April 23, 2012

Perfect Weekend !

This past weekend my dear hubby rode his bike from Houston to Austin to raise money for MS.  He did a great job raising over $1,500 and had a wonderful time on the ride. It was bit windy the first day
but weather was nice over all. I always get to drop him off that the starting line in Houston at 6 am !!
Here he is looking at me right before crossing the finish line in Austin.

And then after he got back to the party tent area.

So you may be wondering what I was up to this weekend, while he was riding his bike 150 plus miles.
hmmm, let's see....
Standing in a really long line in Lexington, TX on a gorgeous Saturday morning
To get some of the best bbq in the state according to
Texas Monthly Magazine.  (sorry about the lack of food
on my plate, it smelled so good I wolfed it down
before I remembered to take a picture.  LOL)

And next,
I traveled on to Austin and checked into a hotel
(and yes, the bed was as comfy as it looked)
And later on Saturday, I met up with
some friends to scrapbook and
of course, have a Margarita , TEXAS sized !

And on Sunday, I went to the MS150 race and cheered by hubby
across the finish line, enjoyed some food and then
drove a very tired man back to Houston.

Perfect weather, perfect company = Perfect Weekend !


Tuesday, April 17, 2012

Look What I Found !!!

I went to Hobby Lobby yesterday evening to pick up a few things for the Crop I am hosting on April 28th in Houston.  They had completely re-arranged the scrapbook section so I had to "hunt" for the things I went there to buy.  And low and behold, look what new products I found and just happened to jump in my shopping cart too ! {insert evil laugh here}

Yes, It is the fabulous new Tim Holtz Distress Markers !
You get 5 markers for only $14.99.  Use your 40% off
coupon and it was only $9.  That makes each marker
only $1.80 each !!  Woohoo !  I have been
wanting to try these out and was so excited to get them.
Will be doing a demo and posting soon for sure !
Next up, they had the new Cricut Chip Decor Cartridge
that is Exclusive to Hobby Lobby only
PLUS....
All the wonderful chipboard to match it!
Very cool !  I didn't buy this (YET)
but was thrilled to see it in person.
They had all these great shapes and letters.
All you need to do is cut out the shape on the
cartridge and glue it on your chipboard shape.
That is a HUGE time saver.  I can only imagine
how cute and fast you can make adorable
projects for your home or to give as gifts using this cartridge.
Next I found all this awesome new
Canvas Corp and Maya Road items ! 
Love all the texture with the canvas and burlap items.
And I really really loved the flowers !
They even had kits !  I bought this cute banner one
but they also had a Recipe Book and a Canvas
Photo Album.  They come with everything you need
and instructions to put the projects together.

As you can see...I had a lot of fun looking at all this eye candy !
So, if you have a Hobby Lobby near you, you might want to
check out all the new things they have hitting the shelves.


Saturday, April 14, 2012

Crafty Me Blog Hop

Welcome to the "Crafty Me" Blog Hop hosted by the Design Team at the The Bug Bytes. If you found the blog hop starting with me, please go back to Pam's Blog and start at the beginning so you don't miss any crafty goodness.

All the design team members had a challenge to create a layout or card using sketches and the color green and the theme of crafting.  I had a ball putting together my layout to share with you today.  We encourage you to create a project and link up at The Bug Bytes so everyone can see your project too.

Here is the layout sketch we were asked to use:

I decided to take the sketch that Pam created for us to use and stretch it to a two page layout to accommodate some photos I had of the word CREATE I made on the wall in my craft room that I wanted to scrap.
I wanted to be even more creative on my layout so I
decided to PUMP UP my journaling by coloring in
some of the words using Colored Pencils.  It was
so fun and really matched the playfulness of my layout.
And I made a fun paper rosette and added an embroidered patch.
I had such fun participating in this challenge!

Thanks for stopping by. Be sure and leave me a comment and let me know what you thought of my challenge layout.

Next up is LORI, hop on over to LORI's BLOG  to see what she made for the challenge.

If you got lost along the way in the blog hop, here is a list of our designers in the hop.
1) Pam - http://www.thebugbytes.com
2) Elizabeth - http://www.217creations.com
3) Michelle - http://ladyofleisureink.blogspot.com/
4) Beatrice -  http://beatrizguzman58.blogspot.com
5) Jen -http://3catsandabug.blogspot.com/
6) Debbie - http://debseclecticthoughts.blogspot.com  (YOU ARE HERE)
7) Lori - http://scrappinmystressaway.blogspot.com/
8) Bobby & Jill  http://cricutcouple.blogspot.com
9)  Kelly  http://kamscraftyplace.blogspot.co.uk
10) Chris - http://chatterscene-mom.blogspot.com/
11) Kimberli - http://kimberliscreations.blogspot.com/
12) Sheila - http://shesasassylady.blogspot.com/

Friday, April 13, 2012

Blog Hop TOMORROW !!

Be sure and stop by starting tomorrow, Saturday April 14th for a Blog Hop hosted by the Design Team at
THE BUG BYTES.  We decided to do this hop as a Challenge Hop.  Each Design Team member will  either do a CARD or LAYOUT, using the color GREEN and the theme of CRAFTING.  It will be a blast so be sure and start at the THE BUG BYTES and hop along back to me and the others. 
See you tomorrow....I can't wait to show you my challenge project !

Thursday, April 12, 2012

My "Cute" New Marker Storage

I recently purchased several sets of the Spectrum Noir Markers by Crafters Companion at Consumer Crafts.  These alcohol ink makers are for stamped image coloring and are comparable to the popular Copic Markers but for about half the price !  While I love the few Copics I own, I certainly appreciate a quality product at a better price, don't you ?

The markers showed up today and while I was excited to use them, I needed to figure out how I was going to store them.  Since I bought 8 color sets of 6 markers each, that is quite a few markers to store.  They do sell a case specifically for the Spectrum Noir Markers, however, it only holds 36 markers and I have more than that and plan to get even more sets to complete my collection so I needed bigger storage in one case.

As I looked at the large pile of markers waiting for a home, I had a brain storm of an idea !  Off to Target I went, hoping my idea would work....and here is what I found to use.

It is a cosmetic travel bag from Contents by Allegro.
It was only $14.99.  And it certainly didn't
hurt that is was hot pink and white polka dots :)
They also had it in all teal or all black.
It even has a handle...Can you say perfect!
Next step was to use some thin chipboard and make
dividers for the inside.  I cut the chipboard 8 1/2" by 4"
to make (8) horizontal pieces, then (1) piece 5 3/4" X 4 1/4"
for the cross piece down the center.  I then cut the
8 1/2" piece at 4 1/4" down the center from the bottom up 
stopping about 1/4" from the top.  Then  slid
the center piece into the 8 long pieces to form the grid.
The dividers fit 6 markers in each section perfectly.
There is enough room to hold 96 of the Spectrum markers.
I have left room for the other color sets that I am missing but
hope to soon acquire to fill in my collection.
As you can see in the picture, I also put my few Copic
Markers in there too...I could get 8 Copics in each section. 
I even added one of the color charts of all the markers
that is part of their packaging to the inside top of the case
for ready reference. I used double sided tape to hold it in place.
And the color set packaging has so much great information
with each marker color code on it,
I decided to use that to create a reference set of tags.
I  cut off part of the package, hole punched it and put it on a binder ring.

I love my new marker storage and the fact
there is plenty of room to grow my marker collection.
And of course, the cute pink polka dot case makes me happy too ! 

Sunday, April 8, 2012

Hoppy Easter Everyone

From our family to yours,
We are wishing all of you
A wonderful Easter today full of love,
family, friends and of course, Bunny activities !

Wednesday, April 4, 2012

Fun Post It Note Holders

I made some fun post it note holders for a few gifts for friends recently.  They were so easy to make but a very useful gift too.  Wanted to share now since with Graduations, End of Year Teacher Gifts, Mother's Day and Father's Day coming up it might spark some creativity in you !

This is a 4X6 Acrylic photo frame I found at the craft store.
I cut a pretty piece of scrapbook paper to fit inside instead
of placing a photo. It also holds a post it note pad that I used
double sided tape on the back to make sure it held well.
And there is even a pen attached to the frame
for fast note taking.  I hate it when I can't find a pen, don't you?

I added the pen by using sticky backed Velcro
I cut into thin pieces to fit on the pen, then the opposite
side on the frame. Works great!.
To embellish the frame, made a Monogram
with the receivers initial using a
rhinestone sticker alpha on a punched
piece of cardstock, then layered on top
of some stacked flowers.

I also added some crinkle ribbon tied in a
bow to the top of the frame for some added pizzaz !
The front of the ribbon is on the outside of the frame but
the backside of the ribbon is actually placed inside
the back of the frame to help hold it in place.

Hope this easy project inspires you to come up with a cute, inexpensive but useful gift for
your upcoming gift giving occassions !


Sunday, April 1, 2012

Fun Times !

Last night I went down to Galveston to meet up with some Circlets that were going on the Cricut Cruise leaving today.  We had a fun time at a pre-cruise dinner that Mary Cork arranged for us at the Salt Grass Steakhouse on the seawall. I wasn't able to go on the cruise cause I needed to stay in town for the arrival of the new grand daughter, but I didn't want to pass up the chance to meet some Circlets coming so close to me :)

There were 32 of us that attended, many circlets from around the country, a few tag alongs and Dan and others from Provo Craft too.

Mary even had door prizes she brought for us...isn't that sweet ! Here is Mary ready to draw another winner and a happy winner next to her, Karen aka KarenDKrafter.

  We thought it was funny that Karen and her friend Cammie, aka Cre8ncam,won the exact same prize !

I even won a prize...a Cricut Cake apron. I think it is adorable something Cricut I didn't already own !

Here I am with one of the Circlets, if I remember correctly her name was Mary.

We even had fun exchanging some Circle Calling cards...
This is Karen's cruise calling card and the adorable twine ship holder too !
Cammie made this really cute layered butterfly calling card.
And Margie Hunter, aka bleeding cricut green, made this fantastic
Cricut on a pink moped calling card that was also a magnet.

And to top off our dinner, Mary had made these adorable Cricut cupcakes.  They were not only delicious but cute too !! 

I had so much fun....sorry I couldn't sail with them all today on the cruise.  Will try and plan to go on the cruise next year if there is one.  Okay, back to reality...laundry, grocery shopping and scrapping !
Happy Sunday to you all !  And Happy Cruising for those on the cruise.


Friday, March 30, 2012

Sweeps Week at My Craft Channel

Do you know about the Sweep Weeks at My Craft Channel ?  Do you even know about all the amazing deals and inspiration to be found there?  You really need to check out My Craft Channel's Blog to read about all the amazing products daily deals they offer at rock bottom prices and all the wonderful videos by big name people in the scrapbook industry.

I have found so much inspiration from watching the craft videos...Heidi Swapp, Teresa Collins, Christy Tomlinson, Kristine McKay, Lori Allred.  It's like taking a mini class from some of my favorite designers for free !  Go to My Craft Channel, then click on the SHOWS link at the top. Next you will see a lot of different shows you can watch, each has multiple episodes.  So grab a cup of your favorite beverage, sit back and enjoy !!!!

Right now, I think today's the last day, they are having contest on the hours from 8 am to 8 pm to win some amazing prizes PLUS there are awesome lower deals on My Craft Channel some great crafting items. 

I have personally ordered from them many times and always receive great products, fast shipping and wonderful customer service.  

Okay, gotta go check out what is the current deal going on...so I don't miss out !

(I am not affliated with My Craft Channel...I just love them so much and they do such an amazing job I wanted to tell my readers about them.)

Monday, March 19, 2012

She's Here !

Our new granddaughter, Giselle Isabella, entered the world today at 1:09 pm. 
Weighing in at 6 lbs 1 oz and 19" of cuteness !

couldn't be happier to be a grandma again !

Thursday, March 8, 2012

Kiss Me I'm Irish !

I am hosting a Weekly Cartridge Exploration Challenge on the Cricut Circle Message Board. This week I chose to  use the Art Philosophy cartridge by Close to My Heart.  This cartridge is so awesome...lots of great images on it, a wonderful font, cards, tags, borders...you name it and this cart has it. 

With the last name of  O'Neal for our household, we hold St. Patrick's Day dear at our house so I decided to make myself a new pin to wear using Art Philosphy.
I used the tag feature for the background. The white
paper is actually white cardstock that I embossed
with the Simply Charmed Embossing folder with
Shamrocks on it. Then used antique ink over some of the embossed images
and added glossy accents over the top.  Other images have
Perfect Pearls rubbed over the top fo the embossing.
The stripped Shamrock is cut out of DCWV glitter paper
and outlined in Golden Rod Stickles and popped dotted up.

The lettering is also cut from Art Philosophy and gold
stickles added for some shine.  The tag is inked with antique gold ink.

I can hardly wait for St. Pat's day now so I can wear my pin !!!!! 

Thursday, March 1, 2012

Farewell to February...but first, one last project :)

February seemed to just fly by...didn't it?  I wanted to share one last project I made in February with you.

I was in a Valentines Swap with two nice ladies on the Circle MB and I made them some gift bags with treats in them...

I used Victorian Romance cricut cartridge for these
beautiful cupid layered die cuts.
I added the heart shaped doily, the Love word, a
heart stick pin and a felt rose flower I made to further
enhance the Victorian valentine theme.

I made them each a gift bag use the die cut shape.
I love how these turned out !

Wednesday, February 22, 2012

What's Black and White and Pink All Over????

WHY A ZEBRA OF COURSE !! 
My youngest daughter is having another baby girl on March 24th.  Yeah !  Another granddaughter to love !!!
She chose a Zebra and Hot Pink theme for the nursery.  It is so pretty together. 

Her best friend gave her a baby shower this weekend and I color coordinated my gifts to match the nursery theme.  She loved it !!!

I made the Zebra tags using my Create A Critter Cricut Cartridge.
I even found these adorable Glittery pink Zebra bags at Target
and Zebra striped tissue at Hobby Lobby.

And I made her this adorable card using
New Arrival Cricut Cartridge and
my cuttlebug polka embossing folder for
the white background pattern paper

Here is the "mommy to be" and my
adorable 9 yr old granddaughter. 
She gave the new baby a Zebra pillow pet !  So cute.
She is very excited to be BIG SISTER after all this time :)

Now we just have to WAIT for the little bundle of joy to arrive !!!

Monday, February 20, 2012

Homemade Washi Tape - Woohoooo !

I am the Designer of the Day  at The Bug Bytes today.  I wanted to share something really fun with everyone today.  Washi tape is all the rage in the paper crafts world right now.  And while I LOVE it, I really don't like how expensive it is to have a big selection in my stash.  So I made some of my own !

It's pretty easy and I really enjoyed coming up with lots of different patterns and colors to use on my projects.

Here are the steps to make your own Washi Tape:

1. You need to get some Score Tape by ScorPal.  I used the 1" score tape but any size will work.  This is a double sided tape where both sides are sticky with one side having a paper lining.

2. Tear off as long of a strip as you like. I made several 12" strips.  I laid them lining side down on my craft mat with the sticky side up.

3. I took plain white tissue paper (like you wrap gifts with) and pressed tissue over each piece of the tape, smoothing it as I went along. You could use colored tissue as well...I just didn't have any to try.

4. Flip the tape over and trim excess tissue paper from the sides with your scissors.

5. Now the real fun begins ! You can color your washi tape using any misting inks such as Tattered Angels, Mr. Huey, Maya Road.  Just spray the color on, then lay a paper towel over the top to soak up the excess. I left a few plain white too.

6. Let the misted strips air dry....I hate to wait so I put a fan on them to dry a little faster.  DO NOT use your heat gun on them as you don't want to melt the adhesive tape.

7. I added various stamps from my stash over the top of the dry misted tape strips.  Different texture stamps or numbers, script fonts, various shapes...you name it, you can add it to make some really adorable Washi Tape.

Here are some samples of the homemade Washi Tapes I made in less than an hour.  I am addicted to making more for every occassion now.  Hope it inspires you to make your own !

Thursday, February 16, 2012

Valentines Day Traditions

Hubby and I usually keep our Valentines Day gifts to traditional type of things but this year, I did something a bit extra fun for him.  

I made this adorable squirrel tag with my Stretch the Imagination Cricut Cartridge
to put on the container I got him to store peanuts on his desk at work to
have a quick snack in the afternoon to keep his energy level up. 
That's what true love is about, right?  Taking care of each other.

He got a big kick out of the tag and the cleverness of the gift.

And my traditional gift from him were these gorgeous tri-colored roses.
They are so fragrant...I just love them and of course the giver more ! 
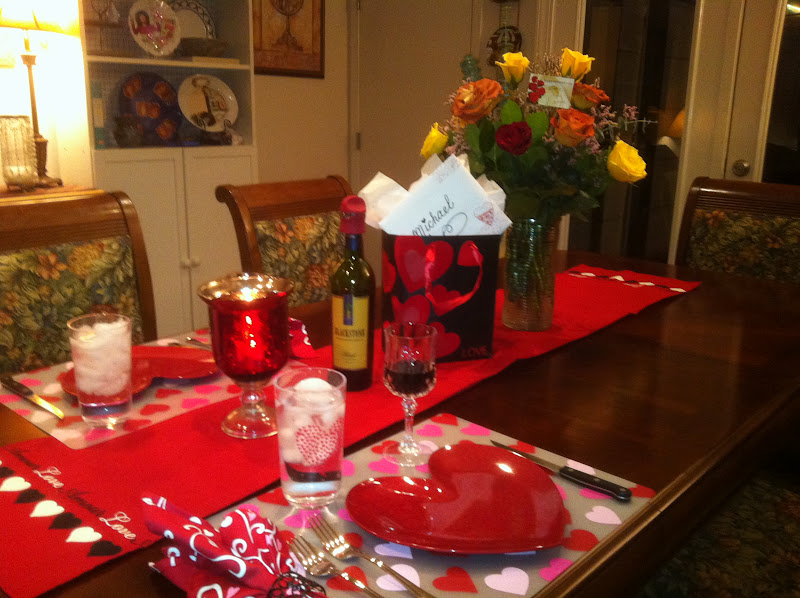
Most years we just have a romantic dinner at home so we can
enjoy ourselves and not fight the crowds at the restaurants. 
I enjoy setting a pretty table for us to amp up the romance !

And here is my sweetie getting ready to enjoy his
rib eye dinner complete with roasted potatoes, grilled
asparagus, crescent rolls and spinach salad.
A glass of red wine and chocolate covered strawberries tops
off our traditional valentine meal !

Hope you all enjoyed your special LOVE day as well.

LinkWithin

Related Posts with Thumbnails