No, it's not another blog hop I am in. I actually hurt my left knee pretty badly after the MS150 weekend and have been having to take meds and rest my leg. Luckily the xrays did not show a tear in my LCL, just a severe sprain. Who would have thought a little twisting of my knee in the wrong direction could wreck such havock ??
Last weekend I hosted a Pre-National Scrapbook Day Crop for about 24 ladies. We had a blast but it was a bit challenging getting ready for it. Thanks to some of my dearest friends, I was able to stay off my knee most of the day...thanks ladies for your help !
I had planned to post some pictures of the crop, however, because I was grounded with my knee propped up on a chair all day long, I completely forgot to take any photos of the event.
The only picture I have to share is of the Matchbook Style Paper Bag Mini Album class that I taught in the afternoon of the crop.
I will post a few more photos later. Blogger is taking forever to upload today.
While the knee is a bit better and the swelling has mostly gone down...I am still kind of Hopping Along on it....if it isn't better next week, I may have to go see the orthopedist. Praying that doesn't have to happen.
Well, just wanted to check in. Be back later with more project photos.
Showing posts with label Mini Albums. Show all posts
Friday, May 4, 2012
Monday, January 16, 2012
Love is in the Air !
My LOVE for mini albums is well known. And when Valentines Day is only a month away, my thoughts turn to making another mini album to showcase my love.
Today I am the designer on The Bug Bytes Blog and I wanted to share with you the paper bag mini album I made for my 2012 Valentines and Things I LOVE pictures that I will take next month.
Start with an assembled paper bag album using 6 lunch size bags.
If you don't know how to make one, there are a ton of videos on You Tube .
I trimmed mine to 6"X 5 1/4". And covered each page
with Valentine paper from my stash cut at 5 3/4" X 5".
Next I like to make a binding for mini album using
patterned paper cut at 3" X 5 3/4"and cardstock cut at 4"X5 3/4".
I used the Swirling Lace Martha Stewart Border punch
to punch the two long sides of the cardstock and then
adhered the patterened paper on top to create the binding.
I then attached the binding to the side of the paper bag album,
leaving about the size of a pen between the paper bag and the binding to
create a slight gap so the album lays flat.
Once the binding is secured, I then move on to the fun part...
decorating the cover. Here I used a heart shaped doily,
K&Co Medallion Dimensional Sticker, a Jenni Bowlin Ticket
and a Maya Road Wood Piece. I then threaded three different
ribbons through the gap of the binding and tied in a knot for a
finishing touch !
Paper Bag Albums are great to add a bunch of
different tags into all the pockets.
I free hand cut some hearts, added some faux stitching
with my journaling pen and attached a heart brad to
create this adorable rotating tag.
On the inside page, I adhered the mini flap on three sides and
left the side opened for the rotating heart tags.
I will also slip in a few 4X6 photos into this pocket.
On a couple of the pages, I created these half photo
pockets and a journaling tag.
On one of the little flaps, I adhered some ribbon
to create a holder for a tag.
Here it is with the journaling tag in place.
With a jumbo scalloped punch, some stamps and a heart shaped brad,
I created another rotating journaling tag for a small inside flap pocket.
I tied some cute ribbon to the little flap pocket and
placed the rotating scalloped tag inside.
On the last page, I made a pocket and added a tag
using cardstock. I adhered a sticker to the front
and some ribbon.
For the large inside pockets of the paper bag album,
I made large double sided photo mats for each pocket.
Alternating colors between black and pink cardstock, and
using the same Martha Stewart Swirling Lace punch
for the edge that sticks out of the pockets.
I do love how this mini album turned out with its
pretty pink, red, white and black color scheme!
Thanks for looking. Let me know if you have any questions about
how I made this. I am working on more Valentines projects
and will be posting them soon so please stop back by.
Happy Scrapping !
Monday, October 24, 2011
Fright Night Paper Bag Album
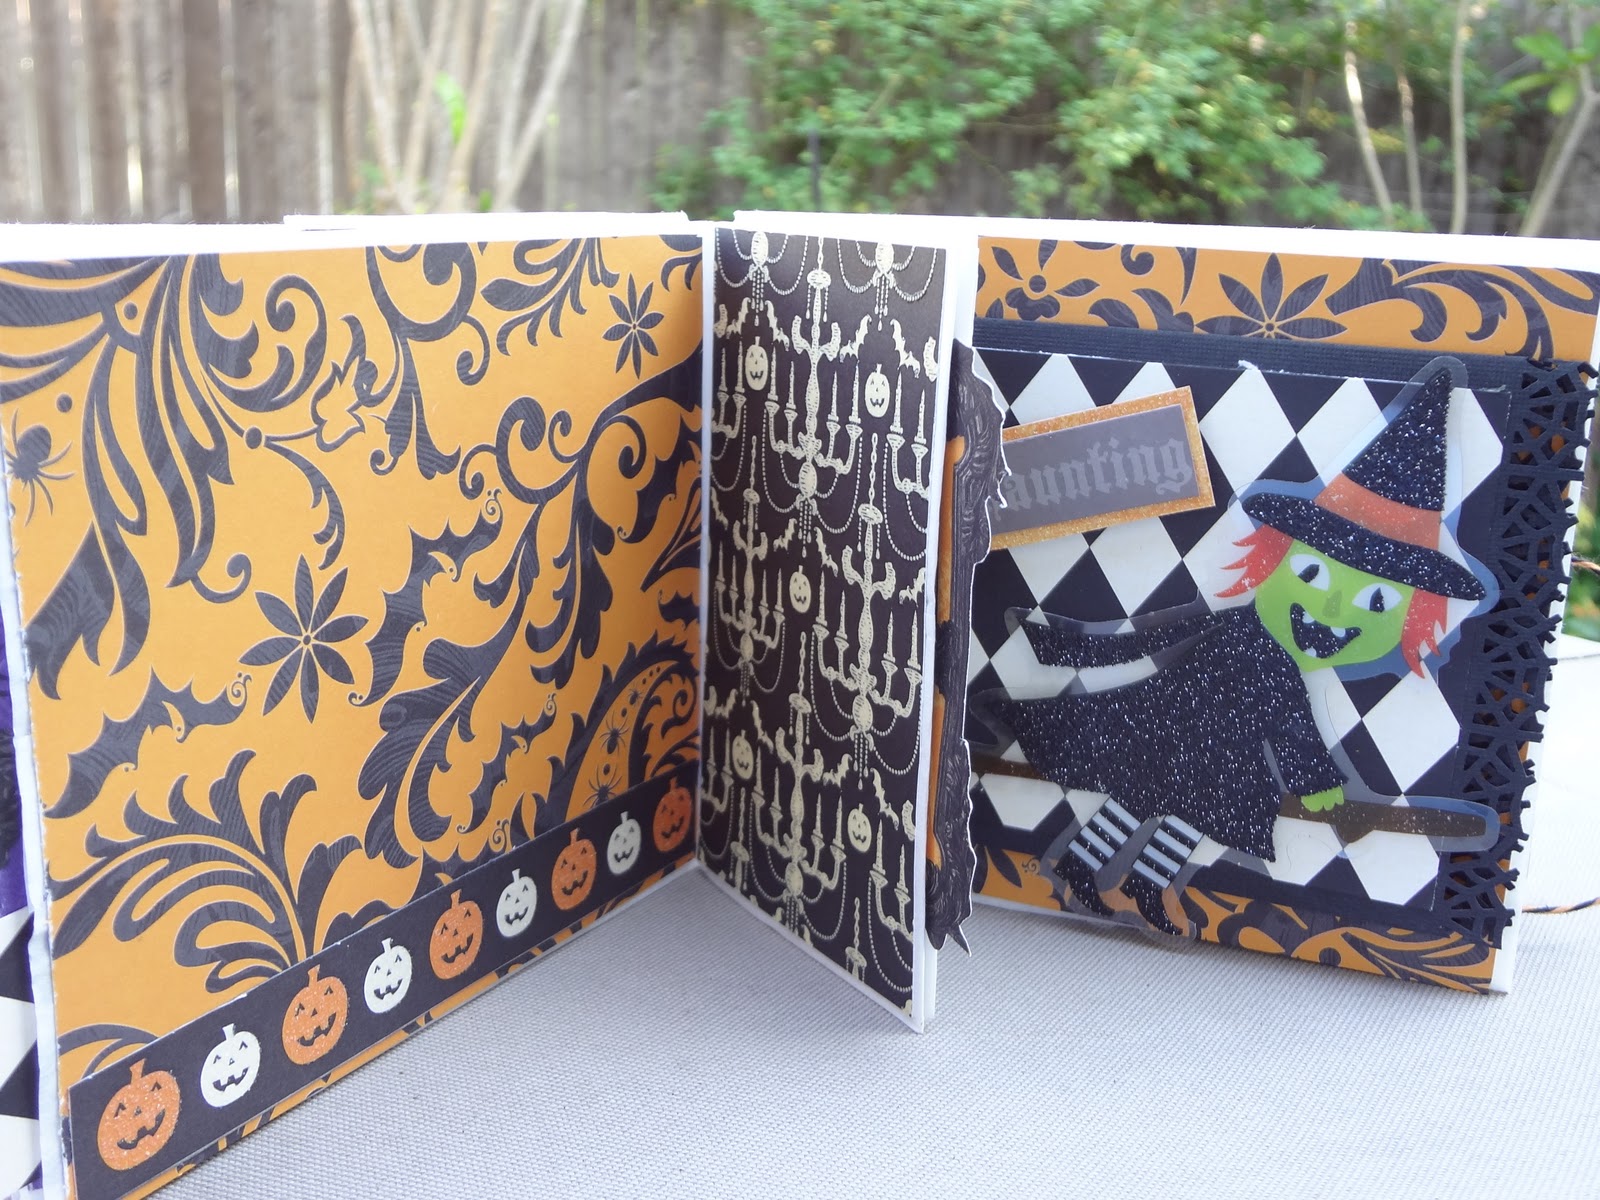
One of my all time favorite things to make are mini albums. I made this Fright Night Paper Bag Mini Album to capture this years Halloween pictures. I added a few twist to the normal paper bag album by making three different fold outs for more pictures to jazz it up a little and I have provided some directions for how I did that. If you have never made a paper bag album there are tons of videos on You Tube to show you how.
Cover of album. I used the DCWV Midnight Magic Paper Pad.
Loads of fun glitterly and bold printed Halloween paper!
I wanted to have a closure for my mini album so I used
some twine and a couple of buttons. Using a mini hole punch I
punched 2 holes in the cover and threaded the twine through that and the large button
and tied it on to create the front closure part. The small button in the picture
is actually tied to a long piece of twine and tied to the back cover. (see later picture)
Inside page 1&2 and the mini pocket that is created with the "bottom" of the paper bags.
Inside page 3&4 and mini pocket
Special Fold Out #1 is adhered to page 4
To create the fold, I used a piece of 12X12 cardstock,
cut in half to create a 6x12 piece (save the other half for Fold #2)
I used MS Spider Web border punch and punched along both 12 inch sides.
Then I scored at 4 & 8 inches to create the folds.
Added a 1 in strip of pp to bottom of inside fold.
I know have room for 3 more 4X6 photos and/or journaling.
Adhere the middle fold to the paper bag album page already covered in pp.
Fold up the bottom flap and let the top flap fold down over that.
Then I decorate the top piece of the fold with pp and some
embellishments for a finished look.
Special Fold Out # 2
This fold is created using the other half of the 6X12 section I cut for Fold Out #1
I placed it on an inside pocket tag I created by cutting a 12X12 piece of pp to 4.5 inches
by 12 inches and folding in half to create a front and back. I added a strip of pp
to the side of it to create a tab for my tag. This is how I made all the Large Tags
I used in the pockets of the paper bag mini album.
I scored the 6X12 piece of cardstock at 4 inches,
then flipped it over and scored at 8 inches.
Thus creating an accordian fold.
Using the MS Spider Web Corner Punch,
I punched the corners of each 4X6 section of the fold out.
Only the top 4X6 section is adhered to the tag.
The rest folds up and ready to pull down to expose photo spaces.
Shows the accordian fold of the 6X12 piece after scoring & folding.
the bottom 4X6 flap up towards the middle flap and
here I added a journaling block.
I then decorated the cover with some pp and a 3d paper embellishment
from Me&MyBigIdeas. I added another of those twine tied
buttons for some added pizzaz.
Inside Pages 5&6 with small pocket.
Special Fold Out #3
is added to page 6 of the paper bag album
after pp has been added to the page
This fold takes (1) 12X12 sheet of cardstock, scored at 4&8 inches along top side,
then turned to score at 4&8 inches along left side. This will create (9) 4X4 blocks scored
on the 12X12 page. Cut out the 4 corner blocks. You will now have a Plus Sign
looking piece with (3) 4X4 blocks horizontal and (3) 4X4 blocks vertical.
Adhere middle 4x4 square to the center of your mini album page.
Fold the bottom 4X4 square up to the middle, then the left to the middle
Then Fold the right 4X4 square to the middle
And lastly fold the top 4X4 square down over the top of all the others.
Adhere pp to the top square and embellish. Decorate each inside square as you like.
Example of anothe Large Tag decorated for inside
paper bag album pocket (front side). I hung an
embellishment from twine so it dangled on the front
and back side of the tag. I added a journaling
block to the front side.
Back side of the pocket above ready for more photos.
For the small pocket inside tags, I just cut double sided patterend paper and
added a 1" pp border for each of the small tags.
The back cover and closure
I hold punched 1 time on the back cover and tied
the long piece of string using about 3 good knots to hold it in place.
I added a little mini button to the loose end that will wrap around
to the front cover to secure the album.
I also added pp to the folded bag edge of the mini album
for a finished look. You can do this before or after you add your covers.
Hope you enjoyed my Fright Night Halloween Mini Album and feel inspired to create one of your own!
Labels:
Halloween,
Mini Albums,
My Classes,
My Projects
Tuesday, November 9, 2010
Flat Stanley's Adventure with the O'Neal Family
We had a house guest the month of October. He wasn't your typical house guest...he came folded up in an envelop and didn't take up much room. The good news was he enjoyed whatever we were doing and was very neat. Yes, you guessed it. We played host to Flat Stanley...a beloved character in the children's books. In the story, Flat Stanley had a bullentin board fall on him and flattens him. He mails himself around the world to have adventures that are documented in the books. How fun is that?!!
One of my MB friends' has a daughter who teaches the Second Grade. The kids in their class sent a Flat Stanley they had colored to a family to host for the month of October. We were responsible for taking Flat Stanley around our city or wherever we were going. We needed to send a few post cards to the child, a souvenir or two and some pictures of Flat Stanley when we returned him. Well you know since I am a scrapbooker, of course I made a scrapbook of Flat Stanley's adventurers with us for the child to enjoy.
Since Bianca is also in the Second Grade knew exactly who Flat Stanley was and was very happy to help me host Flat Stanley in Houston. We were also able to take Flat Stanley on our recent trip to Boston. I thought it was a great opportunity to show Flat Stanley is such an important historical city about our country.
Here are a few pictures of the book I made for the child of Flat Stanley's trip with us. The book has a lot of pockets, tags and flip up pages for added fun.
One of my MB friends' has a daughter who teaches the Second Grade. The kids in their class sent a Flat Stanley they had colored to a family to host for the month of October. We were responsible for taking Flat Stanley around our city or wherever we were going. We needed to send a few post cards to the child, a souvenir or two and some pictures of Flat Stanley when we returned him. Well you know since I am a scrapbooker, of course I made a scrapbook of Flat Stanley's adventurers with us for the child to enjoy.
Since Bianca is also in the Second Grade knew exactly who Flat Stanley was and was very happy to help me host Flat Stanley in Houston. We were also able to take Flat Stanley on our recent trip to Boston. I thought it was a great opportunity to show Flat Stanley is such an important historical city about our country.
Here are a few pictures of the book I made for the child of Flat Stanley's trip with us. The book has a lot of pockets, tags and flip up pages for added fun.
In Houston we took Flat Stanley to our Zoo and to lunch for burgers.
Flat Stanley made it here in time for us to take him to Boston for vacation.
There are so many transportation options in Boston area, we captured a lot of those.
And of course, in Boston you have to do the Freedom Trail
We saw all the historical sites on the Freedom Trail
And we really enjoyed the cooler fall weather and the gorgeous fall colors.
They have an amazing Aquarium in Boston that we visited.
The Giant Sea Turtle and all the Penguins were our favorites.
As you can see, we had a great time in Boston with Flat Stanley
We got back to Houston in time for Flat Stanley to Trick or Treat with Bianca and friends.
I even made him a Ghost Costume to wear.
At the Old State House I bought this children's book about the
American Revolution to send to the class along with the scrapbook.
Plus of course I sent a few other goodies we gathered on our travel to Boston.
We will miss Flat Stanley at our house. I almost feel like we are going through the empty nest syndrome again :)
Subscribe to:
Posts (Atom)