Wednesday, February 22, 2012

What's Black and White and Pink All Over????

WHY A ZEBRA OF COURSE !! 
My youngest daughter is having another baby girl on March 24th.  Yeah !  Another granddaughter to love !!!
She chose a Zebra and Hot Pink theme for the nursery.  It is so pretty together. 

Her best friend gave her a baby shower this weekend and I color coordinated my gifts to match the nursery theme.  She loved it !!!

I made the Zebra tags using my Create A Critter Cricut Cartridge.
I even found these adorable Glittery pink Zebra bags at Target
and Zebra striped tissue at Hobby Lobby.

And I made her this adorable card using
New Arrival Cricut Cartridge and
my cuttlebug polka embossing folder for
the white background pattern paper

Here is the "mommy to be" and my
adorable 9 yr old granddaughter. 
She gave the new baby a Zebra pillow pet !  So cute.
She is very excited to be BIG SISTER after all this time :)

Now we just have to WAIT for the little bundle of joy to arrive !!!

Monday, February 20, 2012

Homemade Washi Tape - Woohoooo !

I am the Designer of the Day  at The Bug Bytes today.  I wanted to share something really fun with everyone today.  Washi tape is all the rage in the paper crafts world right now.  And while I LOVE it, I really don't like how expensive it is to have a big selection in my stash.  So I made some of my own !

It's pretty easy and I really enjoyed coming up with lots of different patterns and colors to use on my projects.

Here are the steps to make your own Washi Tape:

1. You need to get some Score Tape by ScorPal.  I used the 1" score tape but any size will work.  This is a double sided tape where both sides are sticky with one side having a paper lining.

2. Tear off as long of a strip as you like. I made several 12" strips.  I laid them lining side down on my craft mat with the sticky side up.

3. I took plain white tissue paper (like you wrap gifts with) and pressed tissue over each piece of the tape, smoothing it as I went along. You could use colored tissue as well...I just didn't have any to try.

4. Flip the tape over and trim excess tissue paper from the sides with your scissors.

5. Now the real fun begins ! You can color your washi tape using any misting inks such as Tattered Angels, Mr. Huey, Maya Road.  Just spray the color on, then lay a paper towel over the top to soak up the excess. I left a few plain white too.

6. Let the misted strips air dry....I hate to wait so I put a fan on them to dry a little faster.  DO NOT use your heat gun on them as you don't want to melt the adhesive tape.

7. I added various stamps from my stash over the top of the dry misted tape strips.  Different texture stamps or numbers, script fonts, various shapes...you name it, you can add it to make some really adorable Washi Tape.

Here are some samples of the homemade Washi Tapes I made in less than an hour.  I am addicted to making more for every occassion now.  Hope it inspires you to make your own !

Thursday, February 16, 2012

Valentines Day Traditions

Hubby and I usually keep our Valentines Day gifts to traditional type of things but this year, I did something a bit extra fun for him.  

I made this adorable squirrel tag with my Stretch the Imagination Cricut Cartridge
to put on the container I got him to store peanuts on his desk at work to
have a quick snack in the afternoon to keep his energy level up. 
That's what true love is about, right?  Taking care of each other.

He got a big kick out of the tag and the cleverness of the gift.

And my traditional gift from him were these gorgeous tri-colored roses.
They are so fragrant...I just love them and of course the giver more ! 
Most years we just have a romantic dinner at home so we can
enjoy ourselves and not fight the crowds at the restaurants. 
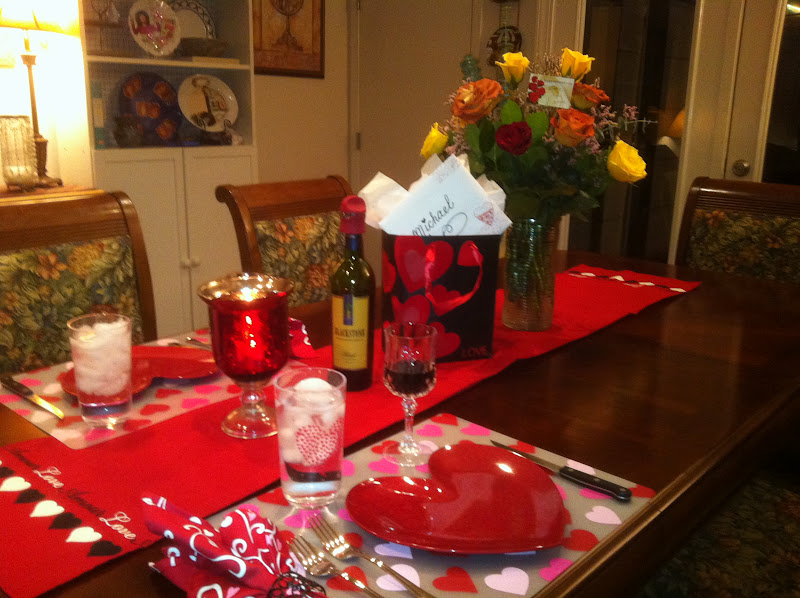
I enjoy setting a pretty table for us to amp up the romance !

And here is my sweetie getting ready to enjoy his
rib eye dinner complete with roasted potatoes, grilled
asparagus, crescent rolls and spinach salad.
A glass of red wine and chocolate covered strawberries tops
off our traditional valentine meal !

Hope you all enjoyed your special LOVE day as well.

Tuesday, February 14, 2012

Happy Valentines Day !

It's Valentines Day !  I hope you have a wonderful day filled with LOVE !  Mine day sure is...

My day started off with a wonderful breakfast cooked and served by my sweet hubby ! 
I LOVE that man so much...it makes my heart hurt sometimes...but in a good way !

After DH left for work, I got to open up my Valentines Day Swap items from two new Cricut Circle friends.

WOW...Ali (aka Scrappin*Creations) sent me all these wonderful items.
She made the beautiful heart box and filled it with some of my favorite
valentine candies...DOVE heart shaped chocolates.
All the other goodies are perfect for my craft projects too.
She was even thoughtful enough to send me a new Santa for my collection...
isn't he adorable ?!?!

And more WOW's when I opened my gift from Becka (aka ScrapperBecka)
Love all the little stamps to use on my cards and the Happy Days paper pad
is so colorful and just my style. And she made me the prettiest notebook too !

I LOVE IT ALL !!!   Thank you ladies for making my Valentines Day a special one.

This afternoon I am going to my granddaugther's Valentine party at school so that will be more Valentines fun !  She was over last weekend and we decorated her Valentines Day Box for school with my Cricut.  It turned out so cute !  She did it all herself...even used my glimmer mist on her heart doilies and made her favorite Panda on the cricut.
  
Then later tonight hubby and I will continue our Valentines celebration with a date night...dinner and a movie. I made him a little something for Valentines Day but won't post it just yet...I wouldn't want him peeking :) 

HAPPY VALENTINES DAY to each of you ! 

Saturday, February 4, 2012

USE YOUR STASH CHALLENGE - LOVE Layout

Still doing the USE YOUR STASH CHALLENGE on the Circle messageboard.  Here is a layout I made using some old paper scraps I had laying around and doily stamps from My Minds Eye I have been wanting to use. I hand cut the heart shapes out of the scrap paper and inked them up some.
I also used a LOVE die cut from the new Victorian Romance cartridge that I actually made
 for a Valentines Day project but was too large...it worked perfectly on the layout instead :)
I just distress inked over it to get the color I wanted.

So what have you created lately ? 

Tuesday, January 31, 2012

CHA Time ! DISTRESS MARKERS

The Craft and Hobby Association's Winter 2012 show is going on right now.  I have been following along with some of my favorite manufacturers to see what is new.  For the next few days I am going to show you what has my heart going "thumpity, thump, thump".

TIM HOLTZ DISTRESS MARKERS
Wow, is all I can say about more goodness from Tim.  His latest edition to the world of crafting are these awesome Distress Markers.  Here is the down low on them:
  • 36 distress colors Plus 1 white picket fence color
  • each marker has a brush tip and a fine tip
  • the fine tip end is a plastic nib so it always stays smooth for writing and fine detail work
  • the marker coloring stays true to its color just like the distress inks we love so much
  • the marker colors blend and layer beautifully  
  • use the white picket fence to color over the other markers to get an opaque look
  • use waterproof ink to stamp an image and then dry before using to color with the markers 
  • use the markers to actually color onto a stamp and then pressing onto paper
  • works great with a water tip brush to blend the colors, which Ranger released this CHA too 
  •  the markers are sold separately for $3.50 each and also as a set, not sure on the price of set
To see the Distress Markers in action, check out Noell Hyman's Paperclipping video from CHA HERE.

Wednesday, January 18, 2012

2012 Organize your Stash Challenge-Stamps & Inks

Another wonderful thing that comes from being a member of the Cricut Circle is the way all the members support each other on the message board.  From inspiring us with their creativity, providing a needed shoulder to cry on when tragedy strikes to helping us celebrate achievements, this group of crafters really are a big part of my online family.

Now some of that support is a "wee bit bad" since they "enable" you by posting deals on scrap supplies they found.  But then, that is balanced by also helping us figure out how to store those items in our craft room !

For 2012, we have an Organize Your Stash Challenge going.  Each week the host post an area we need to organize.  This week we are organizing our Stamps.  I mostly had a system going but needed to straighten this area out and re-org how I was sorting them and all my inks.

This is my stamping station.  My DH added a larger shelf
to some existing builtin bookcases in my craft room so I
had more room to stamp.  Yeah !

I store all my stamps in CD cases.  They are sorted and labeled
by theme and type.  This works out great for me to easily
find what I am looking for when I need a certain stamp.

This is what they look like in their CD case.
As you can see, you can get quite a few in here.

I have a small wire basket
(it's  cute & pink...I bought it at Target last year)
and I keep all my "new, need to be stored" stamps
in here until I get around to using them and putting in
a CD case.  I even have some scrap white cardstock
tucked in the front to use when I need test a stamp.

My inks are stored with my stamps.
I found this wooded shelf set out for
trash in my neighborhood and re-purposed it
to hold some of my inks.
Starting at bottom: embossing inks and large acyrlic blocks
2nd shelf: stazon, waterproof inks and small acrylic blocks
3rd shelf: permanent inks & 7 Gypsy stamper
top shelf: Paper Towels, wet wipes

On the side wall , I hung my roller. And tucked in
between wall and shelf is Ranger Dry Foam and Felt Sheets.
I even have some 12X12 chipboard sheets covered in plastic to use
for portable stamping, painting, glittering when I need to set aside to dry. 

My Distress and Chalk inks are stored temporarily in
some photo boxes...it ain't pretty I know, but
DH is gonna make me two little shelves across that
whole area for me to keep these most used items on
above the stamp cases.   And my markers are stored here
as well in a folding pen holder I turned on it's side.

And my latest addition to this area
is my awesome 4 tiered revolving tray
where I have my mists, daubers, ink daubers,
blending tools, alcohol inks, ink refills, etc.
I LOVE this !  And I saw one on Pinterest and
hunted it down.  For only $20 I can hardly
believe how much this stores !!!!!!


I keep my Cats Eye inks, Stickles and Ranger Pearls and Paint on a shelf next to my inking station.

My Cats Eyes are stored in this Plano box and sorted by color family.
I do keep some basic colors like Chestnut Roan and Black in my tool bag.
My Stickles, and Dimensional Pearls I keep in this
taller Plano box.
I store this box upside down on my shelf so the Stickles
stays to the top and does not dry out. 
Again, I keep one of the white glittery ones like Crystal
or Star Dust in my tool bag for easy access.

My Perfect Pearls. Perfect Medium and assorted brushes are kept in the clear plastic shoe box.
Well, I hope this inspires you to get your stamping area set up.  It's nice to have everything handy
and a specific place to stamp.


Monday, January 16, 2012

Love is in the Air !

My LOVE for mini albums is well known. And when Valentines Day is only a month away, my thoughts turn to making another mini album to showcase my love.

Today I am the designer on The Bug Bytes Blog and I wanted to share with you the paper bag mini album I made for my 2012 Valentines and Things I LOVE pictures that I will take next month.


Start with an assembled paper bag album using 6 lunch size bags.
If you don't know how to make one, there are a ton of videos on You Tube .
I trimmed mine to 6"X 5 1/4". And covered each page
with Valentine paper from my stash cut at 5 3/4" X 5".

Next I like to make a binding for mini album using
patterned paper cut at 3" X 5 3/4"and cardstock cut at 4"X5 3/4".
I used the Swirling Lace Martha Stewart Border punch
to punch the two long sides of the cardstock and then
adhered the patterened paper on top to create the binding.
I then attached the binding to the side of the paper bag album,
leaving about the size of a pen between the paper bag and the binding to
create a slight gap so the album lays flat.

Once the binding is secured, I then move on to the fun part...
decorating the cover.  Here I used a heart shaped doily,
K&Co Medallion Dimensional Sticker, a Jenni Bowlin Ticket
and a Maya Road Wood Piece.  I then threaded three different
ribbons through the gap of the binding and tied in a knot for a
finishing touch !
Paper Bag Albums are great to add a bunch of
different tags into all the pockets.
I free hand cut some hearts, added some faux stitching
with my journaling pen and attached a heart brad to
create this adorable rotating tag.
On the inside page, I adhered the mini flap on three sides and
left the side opened for the rotating heart tags. 
I will also slip in a few 4X6 photos into this pocket.
On a couple of the pages, I created these half photo
pockets and a journaling tag.
 On one of the little flaps, I adhered some ribbon
to create a holder for a tag.
Here it is with the journaling tag in place.
With a jumbo scalloped punch, some stamps and a heart shaped brad, 
I created another rotating journaling tag for a small inside flap pocket.
I tied some cute ribbon to the little flap pocket and 
placed the rotating scalloped tag inside.
On the last page, I made a pocket and added a tag
using cardstock. I adhered a sticker to the front
and some ribbon.
For the large inside pockets of the paper bag album,
I made large double sided photo mats for each pocket.
Alternating colors between black and pink cardstock, and
using the same Martha Stewart Swirling Lace punch
for the edge that sticks out of the pockets. 
I do love how this mini album turned out with its
pretty pink, red, white and black color scheme!

Thanks for looking.  Let me know if you have any questions about
how I made this.  I am working on more Valentines projects
and will be posting them soon so please stop back by.

Happy Scrapping !
 

Monday, January 9, 2012

2012 COLOR OF THE YEAR IS.....

TANGERINE TANGO !!!! 


Defined as a "spirited reddish orange sure to provide the energy boost we need to recharge
and move forward in 2012"  according to the Pantone Color Institute.

“Sophisticated but at the same time dramatic and seductive, Tangerine Tango is an orange with a lot of depth to it,” said Leatrice Eiseman, executive director of the Pantone Color Institute®. “Reminiscent of the radiant shadings of a sunset, Tangerine Tango marries the vivaciousness and adrenaline rush of red with the friendliness and warmth of yellow, to form a high-visibility, magnetic hue that emanates heat and energy.”

Well, I like it !  I wonder how long we need to wait before seeing this color pop up in the craft world?  As you know, the craft world usually follows the Home and Fashion world's color of the year trend.

I guess I better start sorting out stash I already have in that color to get ready for it :)

What do you think of this color?   Love it? Hate it? Willing to Try It ? 

Tuesday, January 3, 2012

Use Your Stash Challenge ...oh yeah !

I have decided to particpate in a USE YOUR STASH challenge on the Cricut Circle Message Board.  Basically, you are challenged to only use up things you already own and not purchase more supplies to complete projects. The challenge is January 1 through March 31st.   Now of course, there are few exceptions such as getting more adhesive,etc. so you can keep working along in the challenge.  You also get to have 1 FREE PASS to purchase something during the three month period if you have a special circumstance such as a scrapbook convention or a special buy you can't resist but you do have to post what that is and justify it to the group.

After looking around at the piles and piles of stuff in my craft room that has gone unloved lately, I thought this was a great way to encourage me to use what I have and enjoy some fun while at it.

So, for USE YOUR STASH #1 I found two Basic Grey card kits I had in my stash and tackled those.  I am nursing a bad cold and just didn't feel inspired to create from scratch but wanted to get something done this week.  The card kits went together quickly and it was encouraging to see my stash pile go down into something that would be used. 

16 cards for birthdays and other events too.  I plan on adding a
stamped sentiment to the inside as I select each card to send out.

and from the scraps leftovers, I made 5 more birthday cards !
yeah, no scraps leftover and now I have 22 cards to send !!!!! 

Okay, who needs a card?  I have some ready for the mail ! 

Welcome 2012 !!!!

Happy New Year to all of you in Blog Land !  It's been a whirlwind end of the year for us.  Getting the house back under control after the holidays.  Celebrating New Years Eve with good friends, going to the last regular season Texans game on New Years Day.  And now, I have the mother of all colds !!  NO FUN !!  I am miserable and not feeling very creative a the moment. So nothing new to post just yet. Just wanted to pop on and say Happy New Year to you all. 

Wishing you a happy, healthy and prosperous 2012.

Sunday, December 25, 2011

Christmas Day Wishes

From My Family to Yours,
Wishing you all a very Merry Christmas and Happy New Year too ! 

Saturday, December 24, 2011

Day One Count Down

Christmas Eve...Only one more sleep...with visions of sugar plums dancing in our heads until Santa drops in !

When I was a child, I saw a movie where Santa uses a "magic key" that lets him into everyone's front door when he stops by to deliver gifts on Christmas eve.  Living in the south, with very few homes with Santa's traditional depicted fireplace access, this was a great way to explain how Santa could enter our home.  I continued the story when my own children questioned how Santa got in our house with out a fireplace and now share that same story with my granddaughter. 

It's important to have traditions that you share with your family.  This is one of many that we have....another is decorating a Gingerbread House and yet another is driving around to see Christmas Lights while listening to Christmas tunes and eating candy canes. 

This year, I hope you are able to share your traditons with those you love.

I wanted to show you a new Santa tradition I started a couple of years ago...by collecting and displaying some beautiful silver and gold Santas. 


I love how the light catches their metallic glimmer and adds elegance to our dining room.

Enjoy your Christmas Eve...I have my side of the family coming over tonight for Christmas Eve dinner and gift exchance.  I can hardly wait to see everyone and share Christmas with them!

Friday, December 23, 2011

Day Two Count Down

WOW...it's getting so close I can almost feel it in the air now.  Christmas is only two days away !!! 

Today I wanted to share a few more special Santas I have displayed.
This is a Vintage Santa that a dear friend
gave me a few years ago.  He is from the early 1950's.

And here is my Texas Santa...as with everything in Texas,
he is large size...too much to hang on the tree but
he gets a special place of honor on the buffet
table in the dining room.

And these Santas are also of the large size variety...
in fact they are so big I have to set them on the floor
in the dining room !

Still a few more special Santas to share
so check back tomorrow for final dose of Santa goodness !

Thursday, December 22, 2011

Day Three Count Down

Only Three more sleeps until it's Christmas Day !  Yipeeeee !

Today I wanted to share a few of my Woodland Santas. I love the more earthy colors of them in comparison to all the traditional red and white.  I have them grouped on a large end table in the living room.
There are still a few more Santas left to share so check back tomorrow please to get
your daily dose of Santa !

Wednesday, December 21, 2011

Day Four Count Down

One, Two, Three, FOUR....only FOUR more days until the guy in the red and white suit comes to bring us some gifts !   I have always told the kids when they ask about Santa that as long as they BELIEVE then Santa is REAL in your heart ! 

And I do dearly BELIEVE in the Spirit of Christmas !

Just a couple of more day before Christmas is here...be sure and check back to see a few more
Santas I have displayed in my house to bring some Christmas Cheer !

Tuesday, December 20, 2011

Day Five Count Down

Only five more sleeps until Santa makes his way here !

Encase you haven't guessed by now, I am slightly Santa obsessed !  LOL  I have over 300 Santa ornaments on my tree, along with assorted vintage glass balls to help add shine.  And about 1000 lights on a real Noble Fir tree to make sure each Santa ornament shines on the tree !  The pictures just can't do it justice but I will let you judge for yourself....

This is what greets you when you enter my
home from the front door. 
Makes me smile every time I come home !

Here is a close up of the Santa tree.
It shines brightly with the white lights and
mostly red and white Santa Ornaments.

And yes, I even have a Santa Tree Topper !

More to come tomorrow of other Santas around my house !


LinkWithin

Related Posts with Thumbnails